Now day’s several industries are exploitation robots as a result of their high level of performance and responsible and that could be a great help for people in general. The obstacle avoidance robotics is used for detecting obstacles and avoiding the collision. This is often an autonomous mechanism. The planning of obstacle avoidance robot needs the combination of the many sensors according to their task.
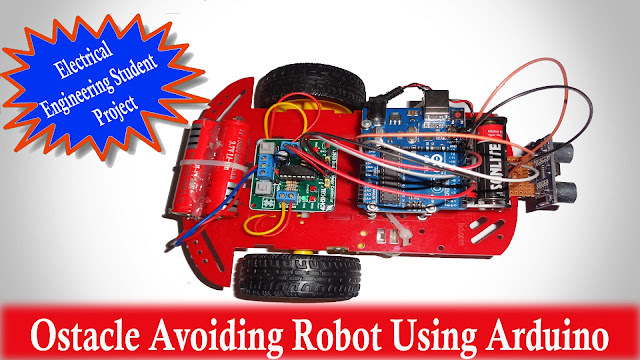
In this project, an Obstacle Avoiding Robot is designed. It is an Arduino based robot that uses Ultrasonic range finder sensors to avoid Obstacle.
Watch the above video to get an idea of what you could build by following this article.
Hardware Required:-
• Arduino UNO .
• HC-SR04 Ultra sonic sensor.
• Robot chassis & 1 Castor Wheel .
• Some Screws & Nuts.
• 2 DC Gear Motors.
• L293D Motor Driver.
• Some Jumper Wires.
• Power source: 9V Battery and 5V battery pack.
• Softwares: Arduino IDE.

Circuit Diagram:-
The control circuitry of this autonomous robot is built around Arduino UNO. The ultrasonic sensor and motor driver L293D IC coupled with two geared DC motors are interfaced with the Arduino board. The control circuitry has the following components and circuit connections –

To control A and B DC motors is sort of easy with the L298D Motor Driver IC. 1st connect every motor to the A and B connections on L298D Motor Driver. If you’re using 2 motors for a robocar make sure that the polarity of the motors is that the same on each input. Otherwise you’ll need to swap them over when you set each motors to forward and one goes backwards.
Next, connect your 9V power supply to the L298D Motor Driver – the positive to pin Vcc on the module and negative/GND to pin GND.
The ultrasonic sensor has 4 pins: Vcc, Trig, Echo and Gnd. Vcc and Gnd are connected to the supply pins 5V and GND of the Arduino. Trig is connected to the 11th pin and Echo is connected to 10th pin of the Arduino.
Finally, connect the Arduino digital output pins to the Motor driver. In our example we have two DC motors, so digital pins D9, D8, D4 and D3 will be connected to pins IN1, IN2, IN3 and IN4 respectively.
More Project:-
Video source By- Learning Engineering
Circuit Diagram of the L293D Motor Driver IC:-

Upload the below Code to Arduino:-
const int trigPin = 11;
const int echoPin = 10;
const int in1 = 9;
const int in2 = 8;
const int in3 = 4;
const int in4 = 3;
const int echoPin = 10;
const int in1 = 9;
const int in2 = 8;
const int in3 = 4;
const int in4 = 3;
void setup()
{
pinMode(trigPin, OUTPUT);
pinMode(echoPin, INPUT);
pinMode (in1, OUTPUT);
pinMode (in2, OUTPUT);
pinMode (in3, OUTPUT);
pinMode (in4, OUTPUT);
}
long duration, distance;
{
pinMode(trigPin, OUTPUT);
pinMode(echoPin, INPUT);
pinMode (in1, OUTPUT);
pinMode (in2, OUTPUT);
pinMode (in3, OUTPUT);
pinMode (in4, OUTPUT);
}
long duration, distance;
void loop()
{
digitalWrite(trigPin, LOW);
delayMicroseconds(3);
digitalWrite(trigPin, HIGH);
delayMicroseconds(12);
digitalWrite(trigPin, LOW);
duration = pulseIn(echoPin, HIGH);
distance = duration/58.2;
if(distance<30)
{
digitalWrite(in1, LOW);
digitalWrite(in2, HIGH);
digitalWrite(in3, HIGH);
digitalWrite(in4, LOW);
}
else
{
digitalWrite(in1, HIGH);
digitalWrite(in2, LOW);
digitalWrite(in3, HIGH);
digitalWrite(in4, LOW);
}
delay(90);
}
{
digitalWrite(trigPin, LOW);
delayMicroseconds(3);
digitalWrite(trigPin, HIGH);
delayMicroseconds(12);
digitalWrite(trigPin, LOW);
duration = pulseIn(echoPin, HIGH);
distance = duration/58.2;
if(distance<30)
{
digitalWrite(in1, LOW);
digitalWrite(in2, HIGH);
digitalWrite(in3, HIGH);
digitalWrite(in4, LOW);
}
else
{
digitalWrite(in1, HIGH);
digitalWrite(in2, LOW);
digitalWrite(in3, HIGH);
digitalWrite(in4, LOW);
}
delay(90);
}
Now it is ready to Test drive and get an experiment yourself….
Applications:-
Obstacle avoiding robots may be utilized in most mobile robot navigation systems.
They can be used for home work like automatic vacuum cleanup.
They can even be utilized in dangerous environments, wherever human penetration may be fatal.